
No-Dig Gardening in the UK: Does It Really Work?

I sometimes use affiliate links in content. This doesn’t cost you anything but I may make a commission payment from anything you buy through these links. As an Amazon Associate I earn from qualifying purchases. All opinions remain my own.
There is a quiet revolution happening in British kitchen gardens, allotments, and back gardens — and it involves doing considerably less than most of us were ever taught. No-dig gardening, the practice of building fertility on top of the soil rather than turning it over each season, has moved from fringe method to mainstream recommendation. The RHS endorses it, Charles Dowding has built a career proving it, and Garden Organic has published guidance on it for UK conditions.
The question is no longer really whether no-dig works — it is whether it will work for you, in your garden, with the compost resources you have. The short answer is yes, with one important caveat: you have to commit to the mulching. Generous, consistent surface applications of organic matter are the engine of the whole system, and get that right and the rewards — fewer weeds, better soil structure, good yields, and significantly less back-breaking labour — follow naturally.
This guide walks through the method in full UK context, covering how to start on grass or weedy ground, how cardboard fits into the picture, and what to grow in your very first season.
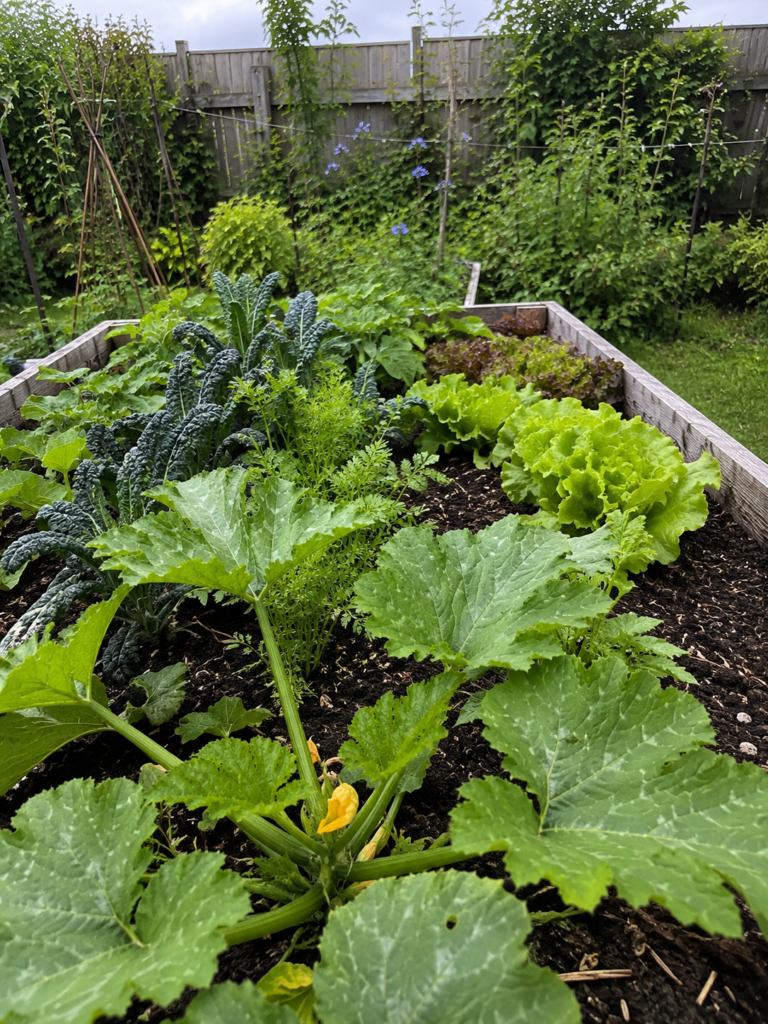
What Is No-Dig Gardening, and Why Does It Suit the UK?
No-dig is exactly what it sounds like: you stop cultivating the soil and instead feed it from the surface with organic matter, mimicking the way a woodland floor continuously renews itself from the leaf litter above. Roots, worms, fungi, and bacteria do the work of incorporating that material downward over time. The soil structure — its pores, channels, and aggregates — remains intact and steadily improves rather than being disrupted each spring by a spade or rotavator.
Forged & Grown
Garden pieces, printed to order
3D printed planters and garden accessories, made in the UK. Self-watering designs, sculptural shapes, colour options — each one made when you order it.


The RHS describes no-dig as an environmentally sustainable approach to soil care, and Garden Organic emphasises that avoiding cultivation minimises damage to soil structure and soil life, creating a rich, friable growing medium over time. These are not minor benefits. Healthy soil structure means better drainage in the wet British winters that waterlog conventional dug beds, and better moisture retention in the increasingly dry spells that catch UK gardeners off guard during summer.
Why the UK Climate Makes No-Dig a Natural Fit
British weather is, generously speaking, variable. We have wet autumns and winters that compact bare, cultivated soil into a claggy mess, followed by springs where gardeners feel they are racing to get beds ready before the window closes. No-dig sidesteps much of this frustration.
Because the surface layer of compost remains loose and crumbly year-round, beds are ready to plant into almost immediately — no waiting for the soil to dry out enough to work. That alone makes a significant difference in the UK, where the planting window can feel frustratingly narrow.
The four UK climate zones also matter here. Gardeners in Scotland and Northern England deal with a shorter growing season and heavier rainfall than those in the South West or Southeast. In wetter, colder regions, the insulating effect of a good compost mulch is especially valuable: it keeps soil temperatures slightly warmer in spring, encouraging earlier germination, and prevents the worst of autumn waterlogging.
In the milder South and Southwest, no-dig beds can be in continuous productive use for eleven months of the year. Even in the Midlands and East Anglia, where frosts linger later into spring, the improved drainage of an established no-dig bed makes it workable sooner than a heavy dug plot.
The Charles Dowding Method: A Practical Template
Charles Dowding’s Homeacre farm in Somerset has become something of a reference point for the UK no-dig movement. His long-running side-by-side trial beds — dug versus undug — consistently show comparable or better yields from the no-dig side, with Dowding reporting average weight gains of around six per cent from undug beds. More importantly for most gardeners, those beds require far less effort to maintain once established.
The Dowding method rests on a simple principle: leave the soil as undisturbed as possible and feed the organisms living within it by adding organic matter to the surface. You are not feeding plants directly — you are feeding the ecosystem that feeds the plants. It is an important mental shift, and once you have made it, the logic of the system becomes clear.
Starting a New Bed: The No-Dig Conversion
The most satisfying application of no-dig is converting an unloved patch of grass, weeds, or neglected ground into a productive growing bed without a single turn of a spade. The process has three stages, and each one is straightforward.
First, cut any tall weeds or grass as low as possible. Do not bother pulling them out — the roots will decompose under the material you are about to layer on top. The one exception is very tough perennials: large-rooted docks, established brambles, and bindweed with deep rhizomes are worth removing properly at this stage, because they will push through even a substantial mulch layer if left in place.
Next, lay cardboard directly on the ground. Use plain brown cardboard — not shiny, not heavily printed, and stripped of any tape, staples, or labels. Overlap the sheets generously, by at least fifteen centimetres, so there are no gaps where determined weeds can find light.
Wet the cardboard thoroughly in dry conditions so it softens and begins breaking down quickly. In typical damp UK weather, the rain usually takes care of this for you within a week or two.
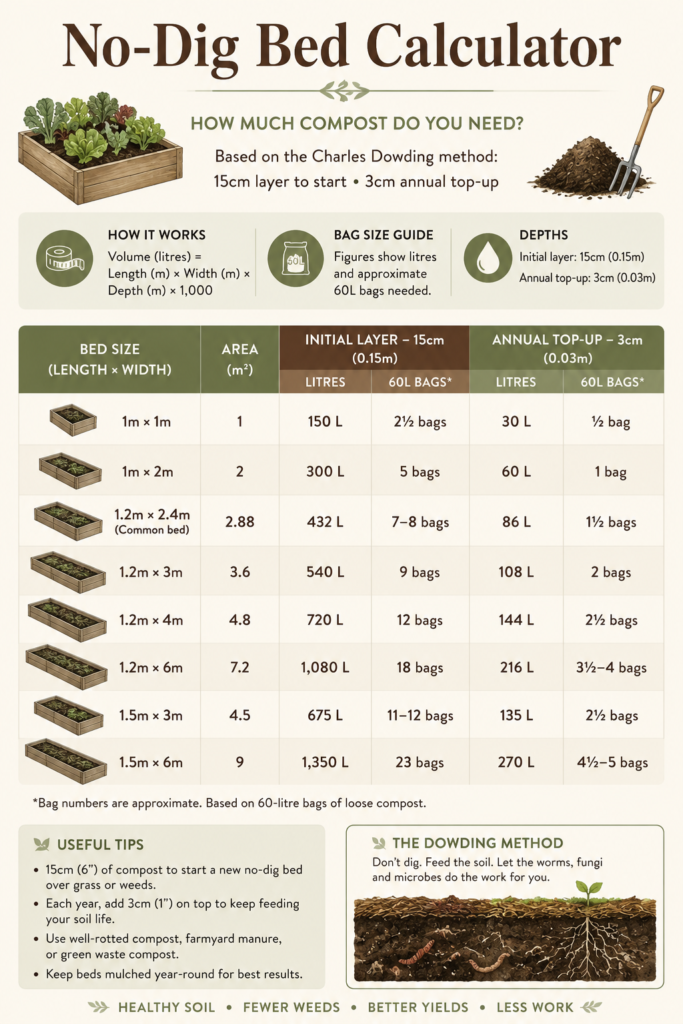
Finally, cover everything with a layer of compost or well-rotted organic matter. Dowding recommends around fifteen centimetres (six inches) for a brand-new bed over grass or weeds. Use whatever you have available: well-rotted farmyard manure, garden compost, local authority green waste compost, or a mix of these.
If you have material of varying quality, put the coarser, less-decomposed material at the bottom and your finest, most broken-down compost on top. That upper layer is what you will be sowing and transplanting directly into.
Ongoing Maintenance: Surprisingly Little
Once your bed is established, the annual maintenance is straightforward. Each autumn or early spring, top the beds up with around two to five centimetres of compost or well-rotted organic matter. No digging, no rotavating, no major soil preparation.
The worm population in a no-dig bed tends to be significantly higher than in a dug one — they thrive on the undisturbed conditions — and those worms do the incorporation work for you. The soil beneath a no-dig bed quietly improves year on year without you lifting a spade.
Weeding is minimal compared to a conventionally dug bed, because the cardboard and compost layer suppress annual weed seeds during establishment. The weeds that do appear in the soft surface layer are easy to pull or hoe away without disturbing the soil beneath. For those in the complete guide to growing your own vegetables stage of planning their kitchen garden, this reduction in ongoing maintenance is one of the most compelling arguments for starting no-dig from the outset.
Cardboard Mulching: Tool, Not Identity
Cardboard has become almost synonymous with no-dig in popular gardening coverage, to the point where some gardeners think they are the same thing. They are not. Cardboard is a useful tool for the initial conversion phase, but it is not the ongoing foundation of a no-dig garden — compost is.
The case for cardboard is strong at the start: it excludes light effectively, kills off grass and annual weeds within a single season, and breaks down into the soil over eight to twelve months, adding a little organic matter of its own. RHS, Garden Organic, and Dowding all describe the layered cardboard-and-compost method as an excellent way to establish new beds.
Using Cardboard Well
Source plain brown cardboard from supermarkets, removal companies, or local shops. Remove all tape, staples, and labels before laying, and avoid shiny surfaces — the coating can slow decomposition and may introduce unwanted chemicals. Be cautious with heavily printed or brightly coloured card for the same reason.
Overlap all seams by at least fifteen centimetres. A gap of even a few centimetres is enough for grass or creeping weeds to exploit, so be thorough at the edges and joins.
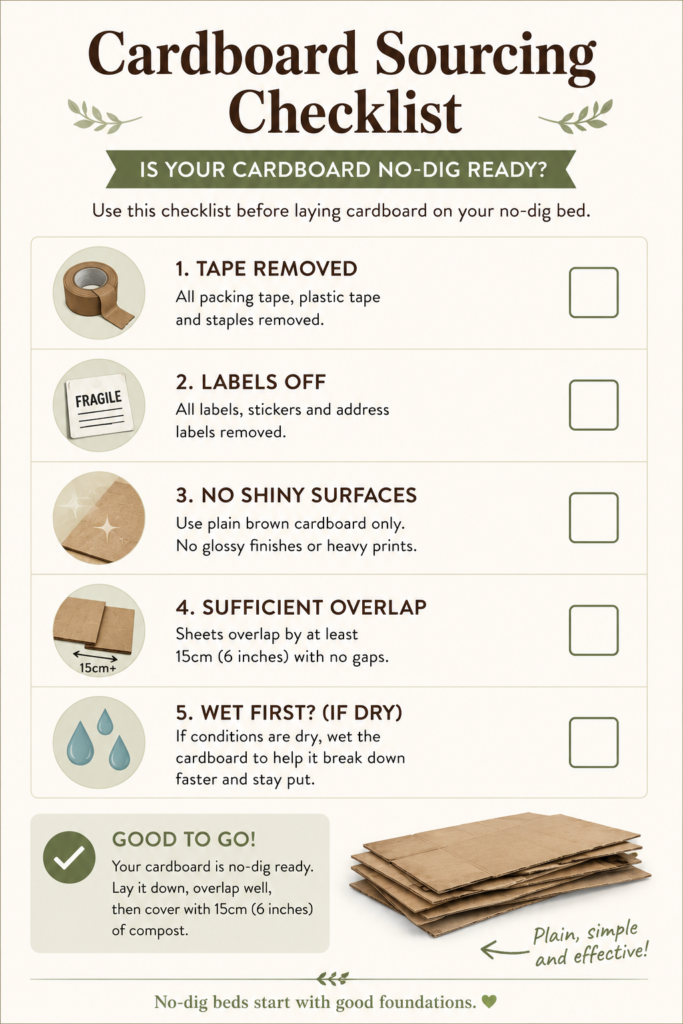
Cover the cardboard promptly with your compost layer. You need at least ten to fifteen centimetres to keep it dark, weighed down, and properly suppressed. In the UK, where autumn and winter rain is fairly reliable, the cardboard usually begins to break down within a few weeks of laying.
When You Can Skip the Cardboard
If you are converting an existing bed that is reasonably clean — perhaps a neglected but not heavily weedy border — you can skip the cardboard entirely. Simply applying a ten to fifteen centimetre layer of compost directly to the surface will suppress most annual weeds and begin improving the soil beneath.
Some soil scientists have raised questions about cardboard, noting concerns around reduced gas exchange in the short term and the possible presence of PFAS chemicals in some card types. These concerns are worth being aware of. The practical takeaway for UK gardeners is to use cardboard as a temporary, one-off conversion tool rather than something you relay every year, and to source the plainest, simplest card you can find.
What to Grow in Your First No-Dig Season
One of the most common questions from gardeners new to the method is whether they actually have to wait before planting. The answer is no — with a good compost layer in place, you can plant or transplant straight away. Roots grow first into that upper compost, and as the cardboard breaks down over the season, they extend naturally into the soil below.
No-dig gardening
What should I grow first?
Tell us how you’re planting and we’ll show you which crops suit a brand-new no-dig bed.
The caveat is that the surface compost in a brand-new bed may be somewhat coarse and variable, which can make direct sowing of tiny seeds less reliable. Many no-dig advocates, including Dowding, recommend transplanting seedlings rather than direct sowing where possible in the first season. Modules give young plants a more reliable start than bare seed pressed into an uneven surface.
Best Crops for Year One
Potatoes are the classic first-year choice: planted into the compost layer rather than deeply buried, they thrive in the loose, moisture-retentive conditions and the act of earthing up integrates the mulch further. Brassicas — kale, cabbages, broccoli — planted as sturdy module-grown plants, establish quickly in rich compost. This pairs well with the advice in the companion planting guide for keeping brassicas healthy through the season.
Courgettes and squashes are almost foolproof on a new no-dig bed, loving the rich compost and usually large enough when transplanted to outgrow any slug competition. Salad leaves — lettuces, spinach, rocket — work well either transplanted or surface-sown into the finer areas of compost.
Onions, leeks, and garlic grown from sets or young plants (rather than seed) also establish reliably in year one. Growing garlic in autumn on a freshly prepared no-dig bed is an excellent way to put new ground to work immediately; the complete guide to growing garlic in the UK covers the timing in full.
Crops to save for year two include carrots and parsnips, which prefer a fine, settled tilth for reliable germination. They can be tricky on the coarser surface of a newly established bed, but once the compost has broken down and the surface has become more uniform in its second season, root vegetables generally perform much better.
Realistic Expectations: Year One and Beyond
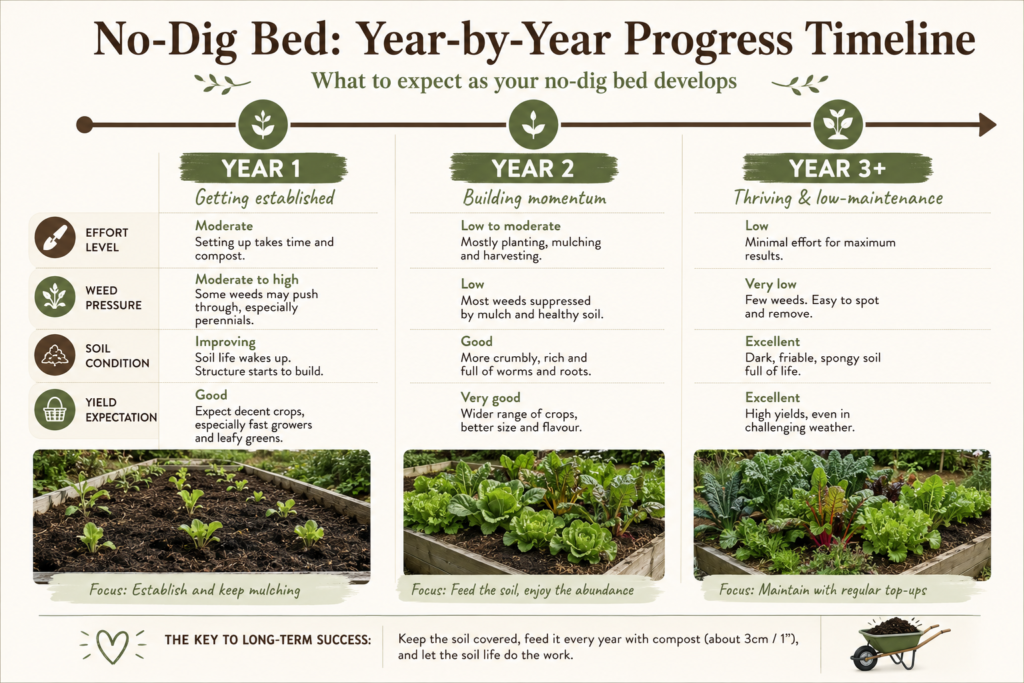
It is worth being honest about the transition year. The first season of a no-dig bed is not always the prettiest — cardboard edges may become visible as the compost settles, some weeds will push through, and the surface may look uneven in places. None of this means the method is failing.
What is happening beneath the surface during that first year is the real story. Worm populations are building in the undisturbed soil, fungal networks are beginning to establish, and the cardboard is quietly breaking down. By the second and third season, the difference between a well-managed no-dig bed and a conventionally dug one becomes increasingly apparent — in tilth, in ease of working, in the health of what grows there.
Slugs: The One No-Dig Caveat
Thick, fresh mulches can attract slugs, particularly in the wet British climate. This is the most commonly raised concern about no-dig in UK conditions, and it is a fair one. Use well-rotted compost rather than fresh, very wet organic matter — it is much less attractive to slugs and better for plant health anyway.
Avoid mulching right up against tender stems, and keep the area around young transplants clear. The guide to protecting plants from slugs and snails covers the full range of UK-appropriate controls if populations become a problem in the first season.
From the second year onwards, as the soil ecosystem matures, predator populations — ground beetles, hedgehogs, frogs — tend to increase in a no-dig environment and slug pressure often reduces naturally.
Is No-Dig Right for Your Garden? An Honest Assessment
The no-dig method suits most UK gardens and almost all growing situations, but it is worth considering your specific circumstances before you begin.
Compost access is the biggest practical constraint. For a new bed, you need a substantial volume of organic matter — enough to cover the area to fifteen centimetres depth. For a typical raised bed of 1.2 by 2.4 metres, that is around 430 litres of compost.
Many UK gardeners supplement with council green waste compost (available in bulk bags from local authorities in many areas), well-rotted farmyard manure sourced locally, or purchased bags while their own heap catches up. Starting a composting system as part of a no-dig garden is highly recommended — the wildlife-friendly composting guide covers how to build capacity that will sustain your beds over time.
Plot size affects how practical the method is in its first year. A small kitchen garden of two or three beds can be converted in a weekend, while a large allotment plot converted all at once requires significant compost volume and careful planning. Many allotment holders convert in phases, establishing two or three no-dig beds in year one and expanding each season as their compost production increases.
Soil type matters less than most gardeners assume. Clay soils, which are widespread in the UK Midlands and much of the South East, benefit enormously from no-dig over time — the undisturbed structure improves drainage gradually, and the compost mulch prevents the surface capping and cracking that makes conventional cultivation so frustrating on heavy clay. Sandy or chalky soils improve their moisture retention with the same approach, and no-dig works on essentially all UK soil types, though the speed of improvement varies.
Building Your No-Dig Garden: A UK Summary
The appeal of no-dig is ultimately about working with the soil rather than against it. British winters are wet enough to make dug, bare soil compaction a genuine problem every year, and the weed seed bank buried in most UK soils is substantial enough that bringing it to the surface year after year — as digging does — is actively counterproductive.
The first investment is the compost. Get that right, in sufficient depth, and the system begins working for you immediately. Add to it each year with a light top-dressing, pull weeds early from the soft surface layer, and resist the urge to dig when something goes wrong — in most cases, adding a little more compost is the better response.
The raised bed gardening guide offers a natural companion to no-dig principles if you are building new growing infrastructure from scratch. And if you are starting a broader grow-your-own journey rather than just converting existing beds, starting a vegetable garden from the beginning gives a useful wider framework for what to grow and in what order.
No-dig is not a shortcut. It asks for upfront investment in compost and a willingness to let the soil do more of the work. But for UK gardeners dealing with imperfect weather, heavy soils, and not enough hours in the day, it is one of the most rational approaches to productive growing available.
Frequently Asked Questions
Do I need to remove all the weeds before starting no-dig? You need to remove large, deep-rooted perennials such as brambles, large docks, and established bindweed before laying cardboard. Annual weeds and grass can be left in place — the cardboard and compost will smother them. Cut tall growth low first so the cardboard lies flat.
Can I start no-dig in autumn in the UK? Autumn is an excellent time to set up new no-dig beds. The cardboard and compost can sit over winter, breaking down and enriching the soil, so beds are ready to plant into from late winter or early spring. Garlic can even be planted straight into a freshly prepared bed in October or November.
How much compost do I need for a no-dig bed? For a new bed over grass or weeds, aim for around fifteen centimetres (six inches) of compost. For a 1.2 by 2.4 metre bed, that is approximately 430 litres. Once established, you top up annually with just two to five centimetres, so the ongoing cost drops significantly.
Will no-dig work on heavy clay soil? Yes — clay soil is one of the types that benefits most from no-dig over time. Digging clay repeatedly tends to destroy its structure and create a hard pan below the cultivation zone. Leaving clay soil undisturbed while adding compost to the surface gradually improves both drainage and workability year by year.
Can I direct sow seeds in a no-dig bed? Yes, though it works best once the bed is established. In the first season, transplanting module-grown seedlings is more reliable because the surface compost can be coarse and uneven. By the second season, fine-sown crops including carrots, beetroot, and salad leaves perform well.
What should I do about slugs in a no-dig bed? Use well-rotted compost rather than fresh or wet mulch, which is more attractive to slugs. Avoid mulching right up to stems, and encourage ground-level predators by creating habitats nearby — log piles, undisturbed margins, or a small pond. Slug pressure often decreases from year two as the local predator population builds.
Are you planning to convert to no-dig this season, or are you already growing without a spade? Share what’s working in your garden below — or let us know which crops you’re starting with in your first no-dig bed.
If you’d like to receive seasonal growing guides and new posts straight to your inbox, you can sign up for the Crafting Her Blooms newsletter below.
Continue Your Journey
- Raised Bed Gardening UK: How to Build, Fill and Grow More Than You Ever Thought Possible — everything you need to know about setting up productive beds from scratch, including filling methods that work beautifully alongside no-dig.
- How to Start a Wildlife-Friendly Composting System in Your UK Garden — building your compost supply is the foundation of successful no-dig gardening; this guide shows you how to get there.
- The Complete UK Guide to Growing Your Own Vegetables — the broader framework for planning a productive kitchen garden through the British seasons.
- Companion Planting UK: The Complete Guide to What to Plant Together — once your no-dig beds are established, companion planting is one of the best ways to maintain their health without chemical intervention.
- Effective Ways to Protect Your Plants from Slugs and Snails — practical UK-focused advice for managing the one pest that can be more active on freshly mulched beds.


